认识 OpenClaw
OpenClaw 是一个开源、自托管的 AI Agent 网关。你可以直接在聊天软件中给 AI 发任务,让它完成代码、检索、浏览器操作与自动化流程。
核心架构
聊天渠道 -> Gateway -> Agent -> LLM API- Gateway:统一连接渠道、管理会话、路由任务。
- Agent:执行任务的 AI 实体,可读写文件、执行命令、调用工具。
- Skill:能力扩展模块,可按业务场景组合。
典型场景
- 在 Telegram 里让 AI 直接修项目 bug。
- 上传数据文件后自动生成分析结果。
- 通过浏览器自动化完成网页查询与回传截图。
- 定时抓取信息并推送到群聊。
为什么值得学
| 能力 | OpenClaw | 普通聊天 AI |
|---|---|---|
| 多渠道接入 | 支持 | 有限 |
| 自托管 | 支持 | 通常不支持 |
| 长期自动化 | 支持 | 较弱 |
准备工作
在开始使用 Claw 之前,你需要准备好开发环境和必要的账号资源。本章将指导你完成所有前置准备工作。
系统要求
Claw 支持主流操作系统,但对硬件和软件环境有一定要求:
最低配置:
- CPU: 2核心
- 内存: 4GB RAM
- 存储: 10GB 可用空间
- 操作系统: Linux (Ubuntu 20.04+), macOS (12+), Windows 10/11 (with WSL2)
推荐配置:
- CPU: 4核心或更多
- 内存: 8GB RAM 或更多
- 存储: 20GB SSD
- 稳定的网络连接(用于 API 调用)
对于生产环境部署,建议使用至少 8GB 内存和 4 核 CPU,以确保多 Agent 并发执行时的稳定性。如果你计划使用浏览器自动化功能,内存需求会更高(建议 16GB)。
必备软件安装
Node.js 环境
Claw 需要 Node.js 18 或更高版本。推荐使用 LTS 版本:
# 检查当前 Node.js 版本
node --version

# 使用 nvm 安装(推荐)
curl -o- https://raw.githubusercontent.com/nvm-sh/nvm/v0.39.0/install.sh | bash
nvm install 20
nvm use 20

# 验证安装
node --version  # 应显示 v20.x.x
npm --version   # 应显示 10.x.x
如果你使用的是 Windows,可以从 Node.js 官网 下载安装包,或使用 nvm-windows。
Docker 安装(推荐)
Docker 是运行 Claw 最简单的方式,避免了复杂的依赖配置:
# macOS 和 Windows: 下载 Docker Desktop
# https://www.docker.com/products/docker-desktop

# Linux (Ubuntu) 安装
curl -fsSL https://get.docker.com -o get-docker.sh
sudo sh get-docker.sh

# 验证安装
docker --version
docker compose version

# 配置用户权限(Linux)
sudo usermod -aG docker $USER
# 需要重新登录以生效
对于生产环境,建议使用 Docker Compose 进行部署,这样可以更方便地管理配置和数据持久化。
Git 版本控制
# 安装 Git(如果尚未安装)
# macOS
brew install git

# Ubuntu/Debian
sudo apt-get update
sudo apt-get install git

# 验证安装
git --version
LLM API 密钥准备
Claw 的核心功能依赖于大语言模型 API。你需要至少准备一个 LLM 提供商的 API 密钥。
OpenAI API
- 访问 OpenAI Platform
- 注册并完成身份验证
- 在 Dashboard 中创建 API Key
- 设置使用限额和预算提醒(推荐)
# 测试 API 密钥
curl https://api.openai.com/v1/models \
  -H "Authorization: Bearer YOUR_API_KEY"
成本估算: GPT-4 Turbo 的成本约为 $0.01/1K tokens (输入) + $0.03/1K tokens (输出)。一般的对话任务,每天 100 次交互大约花费 $2-5。
Anthropic Claude API
- 访问 Anthropic Console
- 申请 API 访问权限
- 生成 API Key
- 记录你的配额限制
Claude 3.5 Sonnet 在编码和推理任务上表现优异,适合作为 Claw 的主力模型。
本地模型(可选)
如果你担心成本或隐私问题,可以使用本地模型:
# 安装 Ollama
curl -fsSL https://ollama.com/install.sh | sh

# 拉取模型
ollama pull llama3.1:8b
ollama pull qwen2.5-coder:7b

# 验证运行
ollama run llama3.1:8b "Hello!"
本地模型的优势是零 API 成本和完全的数据隐私,但需要更强的硬件配置(至少 16GB RAM 用于 7B 模型)。
消息平台账号
根据你的需求,准备以下平台的机器人账号:
Telegram Bot
- 在 Telegram 中找到 @BotFather
- 发送
/newbot创建新机器人 - 按提示设置机器人名称和用户名
- 保存 Bot Token(格式:
123456789:ABCdefGHIjklMNOpqrsTUVwxyz)
# 测试 Bot Token
curl "https://api.telegram.org/bot<YOUR_BOT_TOKEN>/getMe"
Discord Bot(可选)
- 访问 Discord Developer Portal
- 创建新的 Application
- 在 Bot 选项卡中创建 Bot
- 启用必要的 Intents(Message Content Intent 等)
- 复制 Bot Token
环境变量模板
创建一个 .env 文件作为配置模板:
# LLM API Keys
OPENAI_API_KEY=sk-...
ANTHROPIC_API_KEY=sk-ant-...

# Message Channels
TELEGRAM_BOT_TOKEN=123456789:ABC...
DISCORD_BOT_TOKEN=MTk4...

# Database (可选)
DATABASE_URL=postgresql://user:pass@localhost:5432/claw

# Other Settings
NODE_ENV=development
LOG_LEVEL=info
安全提示: 永远不要将 .env 文件提交到 Git 仓库。确保 .gitignore 中包含 .env。
检查清单
在进入下一章之前,确认你已完成:
- 安装 Node.js 18+ 或 Docker
- 安装 Git 并配置基本信息
- 获得至少一个 LLM API 密钥并测试可用
- 创建至少一个消息平台机器人账号
- 准备好
.env配置文件模板 - 确保网络可以访问相关 API 服务
完成这些准备后,你就可以开始安装 Claw 了。
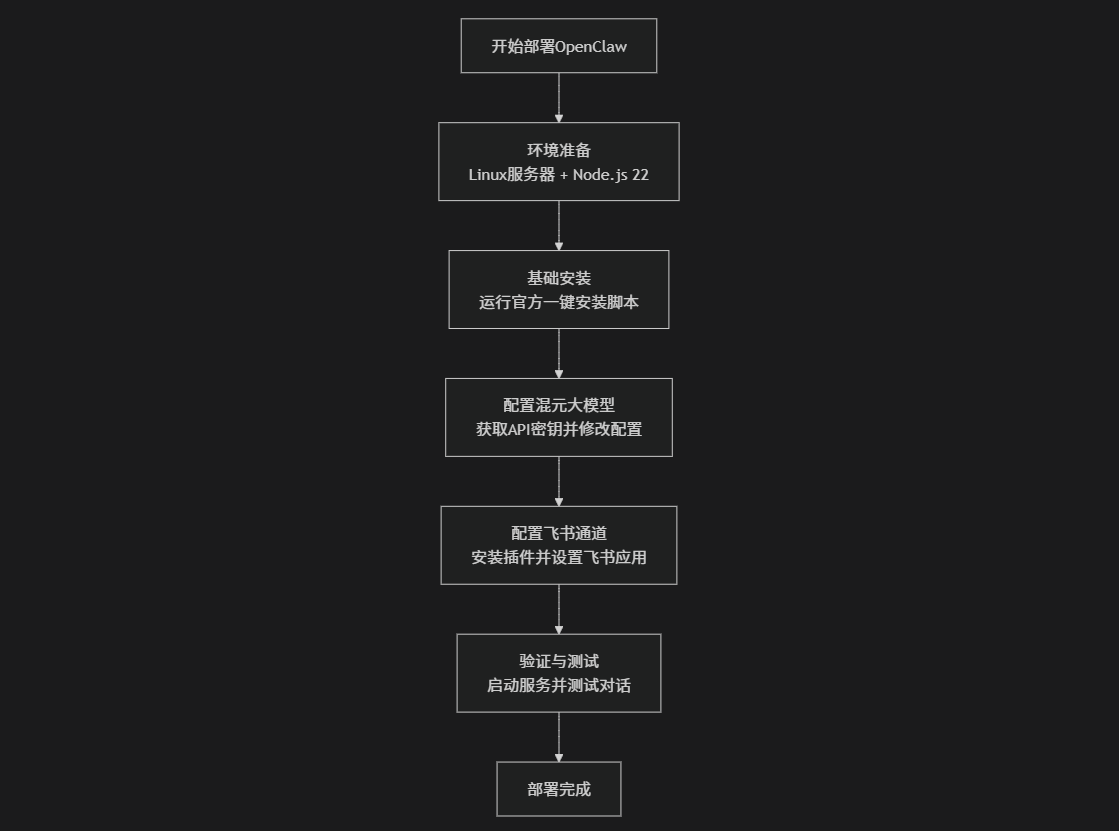
安装部署
本章介绍 OpenClaw 的主流安装方式:一键脚本、npm 手动安装、Docker 部署。
方式一:一键安装脚本(推荐)
macOS / Linux / WSL2
curl -fsSL https://openclaw.ai/install.sh | bashWindows PowerShell
iwr -useb https://openclaw.ai/install.ps1 | iex如果只想安装、不立即进入向导:
curl -fsSL https://openclaw.ai/install.sh | bash -s -- --no-onboard方式二:npm 手动安装
# 确保 Node.js 22+
node --version

# 全局安装 OpenClaw
npm install -g openclaw@latest

# 运行配置向导(同时安装守护进程)
openclaw onboard --install-daemon
方式三:Docker 部署
docker pull openclaw/openclaw:latest

docker run -d \
  --name openclaw \
  -p 18789:18789 \
  -v ~/.openclaw:/root/.openclaw \
  -e ANTHROPIC_API_KEY=sk-ant-xxx \
  openclaw/openclaw:latest
安装后验证
openclaw --version
openclaw doctor
openclaw gateway status
openclaw dashboard
如果 openclaw dashboard 能正常打开,说明网关已可用。
常见问题
命令找不到
npm prefix -g
export PATH="$(npm prefix -g)/bin:$PATH"
sharp 编译失败(macOS 常见)
SHARP_IGNORE_GLOBAL_LIBVIPS=1 npm install -g openclaw@latest端口冲突
lsof -i :18789
openclaw gateway --port 19000
网关无法启动
openclaw doctor
openclaw doctor --fix
openclaw logs --follow
下一步
继续阅读《基础配置》,完成模型、渠道和工作空间设置。
基础配置
OpenClaw 使用 ~/.openclaw/openclaw.json(JSON5)作为主配置文件。
首次向导
openclaw onboard --install-daemon向导会自动完成:认证 Token、默认模型、可选消息渠道与守护进程安装。
最小可用配置
{
  agents: {
    defaults: {
      model: {
        primary: "anthropic/claude-sonnet-4-5",
      },
      workspace: "~/.openclaw/workspace",
    },
  },
}
在 ~/.openclaw/.env 中写入 API Key:
ANTHROPIC_API_KEY=sk-ant-api03-xxxxx常用命令
# 查看配置
cat ~/.openclaw/openclaw.json

# 设置配置项
openclaw config set agents.defaults.model.primary "anthropic/claude-opus-4-6"

# 读取配置
openclaw config get

# 修改后重启
openclaw gateway restart
推荐结构示例
{
  gateway: {
    mode: "local",
    port: 18789,
    bind: "loopback",
    auth: {
      token: "${OPENCLAW_GATEWAY_TOKEN}",
    },
  },
  agents: {
    defaults: {
      workspace: "~/.openclaw/workspace",
      model: {
        primary: "anthropic/claude-sonnet-4-5",
        fallbacks: ["deepseek/deepseek-chat"],
      },
      thinkingDefault: "low",
      timeoutSeconds: 600,
    },
  },
}
验证配置
openclaw doctor
openclaw status
openclaw dashboard
下一步
继续《消息渠道》配置 Telegram / Discord / WhatsApp 等渠道。
消息渠道
OpenClaw 支持同时接入多个消息渠道,一个 Gateway 统一管理。
Telegram(推荐)
- 在 Telegram 用
@BotFather创建 Bot,拿到 Token。 - 配置
~/.openclaw/openclaw.json:
{
  channels: {
    telegram: {
      enabled: true,
      botToken: "123456789:ABCdefGHIjklMNO",
      dmPolicy: "pairing",
      groups: {
        "*": { requireMention: true },
      },
    },
  },
}- 重启并完成配对:
openclaw gateway restart
openclaw pairing list telegram
openclaw pairing approve telegram <配对码>
常见问题
# 查看日志
openclaw logs --follow- 私聊不回复:确认 Bot Token、Gateway 状态。
- 群聊不回复:需要
@机器人或关闭 Telegram Privacy Mode。 - 国内网络问题:配置代理
proxy: "socks5://127.0.0.1:7890"。
多渠道示例
{
  channels: {
    telegram: { enabled: true, botToken: "xxx" },
    discord: { enabled: true, token: "xxx" },
    whatsapp: { dmPolicy: "pairing", allowFrom: ["+86xxxxxxxxxxx"] },
  },
}
下一步
继续《模型配置》,把默认模型与备用模型配置好。
模型配置
OpenClaw 支持内置 Provider 和自定义 Provider,可按成本与效果组合使用。
常见内置 Provider
anthropic(Claude)openai(GPT)openrouterminimaxzaimoonshotollama
多模型与别名
{
  agents: {
    defaults: {
      models: {
        "anthropic/claude-opus-4-6": { alias: "opus" },
        "anthropic/claude-sonnet-4-5": { alias: "sonnet" },
        "openai/gpt-5.2": { alias: "gpt" },
        "deepseek/deepseek-chat": { alias: "ds" },
      },
      model: {
        primary: "anthropic/claude-sonnet-4-5",
        fallbacks: ["minimax/MiniMax-M2.1"],
      },
    },
  },
}
聊天中快速切换:
/model opus
/model gpt
/model ds
自定义 Provider(重点)
{
  models: {
    mode: "merge",
    providers: {
      "my-provider": {
        baseUrl: "https://api.example.com/v1",
        apiKey: "${MY_API_KEY}",
        api: "openai-responses",
        models: [{
          id: "model-name",
          name: "显示名称",
          reasoning: false,
          input: ["text"],
          contextWindow: 128000,
          maxTokens: 8192,
        }],
      },
    },
  },
}
Codex 系列必须使用
openai-responses,不要误用openai-completions。
Token 与成本查看
openclaw status
openclaw dashboard
如需成本可视化,建议在消息前缀显示模型名:
{
  messages: {
    responsePrefix: "[{model}]",
  },
}
Agent 配置
OpenClaw 的 Agent 行为主要由工作空间文件驱动。
工作空间关键文件
默认目录:~/.openclaw/workspace/
AGENTS.md:行为规范SOUL.md:人格与表达风格USER.md:用户背景与偏好TOOLS.md:本地工具笔记MEMORY.md:长期记忆(仅主会话加载)
常用会话命令
/new
/reset
/model <alias>
/thinking off|low|high
/status
多 Agent 示例
{
  agents: {
    list: [
      {
        id: "personal",
        default: true,
        workspace: "~/.openclaw/workspace-personal",
        model: "anthropic/claude-opus-4-6",
        identity: { name: "小助", emoji: "🤖" },
      },
      {
        id: "work",
        workspace: "~/.openclaw/workspace-work",
        model: "anthropic/claude-sonnet-4-5",
        identity: { name: "工作助手", emoji: "💼" },
      },
    ],
  },
}
下一步
继续《自动化》,让 Agent 在指定时间自动执行任务。
自动化
OpenClaw 通过 cron 和 heartbeat 实现自动执行任务。
启用 Cron
{
  cron: {
    enabled: true,
    maxConcurrentRuns: 2,
  },
}
常用命令
# 新增任务(每天 9 点)
openclaw cron add --schedule "0 9 * * *" \
  --message "总结昨天的邮件并发到 Telegram" \
  --channel telegram --target <你的ChatID>

# 查看任务
openclaw cron list

# 删除任务
openclaw cron remove <cron-id>
Heartbeat(周期检查)
{
  agents: {
    defaults: {
      heartbeat: {
        every: "30m",
        target: "last",
        model: "openai/gpt-5-mini",
      },
    },
  },
}
在工作空间写 HEARTBEAT.md,定义检查清单(邮箱、日历、通知等),减少重复配置。
何时用 Cron,何时用 Heartbeat
- 需要精确时刻触发:用
cron - 需要批量检查并复用上下文:用
heartbeat
下一步
结合《浏览器控制》,把网页检查、截图和日报做成自动流程。
浏览器控制
OpenClaw 支持两种浏览器模式:
openclaw托管浏览器(自动化任务)chrome扩展接管(使用你现有登录态)
基础配置
{
  browser: {
    enabled: true,
    defaultProfile: "openclaw",
    profiles: {
      openclaw: { cdpPort: 18800, color: "#FF4500" },
    },
  },
}
CLI 常用命令
openclaw browser --browser-profile openclaw status
openclaw browser --browser-profile openclaw start
openclaw browser --browser-profile openclaw open https://example.com
openclaw browser --browser-profile openclaw screenshot
openclaw browser --browser-profile openclaw snapshot
Chrome Extension 使用流程
- 安装 OpenClaw Browser Relay 扩展。
- 打开目标网页,点击扩展图标,使 Badge 显示 ON。
- 在聊天中直接让 Agent 执行点击、输入、读取等任务。
下一步
继续《高级功能》,结合 cron 与浏览器实现自动化。
高级功能
掌握 OpenClaw 的高级特性,释放 AI Agent 的全部潜力。
文件管理
Agent 可以读写文件系统:
file_system:
  workspace: "/workspace"

  permissions:
    read:
      - "/workspace/**"
      - "/data/**"

    write:
      - "/workspace/**"
      - "/output/**"

    execute:
      - "/workspace/scripts/**"

  max_file_size: "100MB"

  allowed_extensions:
    - .txt
    - .md
    - .json
    - .py
    - .js
代码执行沙箱
安全地执行用户代码:
sandbox:
  enabled: true

  python:
    enabled: true
    version: "3.11"
    timeout: 60s
    max_memory: "1GB"

    allowed_packages:
      - numpy
      - pandas
      - matplotlib
      - requests

  javascript:
    enabled: true
    runtime: "node"
    version: "20"
    timeout: 30s
使用示例:
# 用户: 帮我用 Python 分析这个 CSV 文件

import pandas as pd
df = pd.read_csv('/workspace/data.csv')
print(df.describe())
RAG 知识库
接入向量数据库,实现 RAG:
knowledge_base:
  enabled: true

  vector_db:
    type: "qdrant"
    host: "localhost"
    port: 6333

  embedding:
    model: "text-embedding-3-small"
    dimension: 1536

  retrieval:
    top_k: 5
    min_score: 0.7

  sources:
    - name: "公司文档"
      path: "/knowledge/company_docs"
      sync_interval: "1h"
Agent 会自动从知识库检索相关信息回答问题。
API 集成
调用外部 API 扩展能力:
integrations:
  - name: "Weather API"
    type: "rest"
    base_url: "https://api.weather.com"
    auth:
      type: "api_key"
      header: "X-API-Key"
      value: "${WEATHER_API_KEY}"

    endpoints:
      - name: "get_weather"
        method: "GET"
        path: "/current"
        params:
          city: "{city}"

  - name: "GitHub API"
    type: "graphql"
    url: "https://api.github.com/graphql"
    auth:
      type: "bearer"
      token: "${GITHUB_TOKEN}"
Agent 可以调用这些 API 获取实时数据。
Skills 技能系统
Skill 是 OpenClaw 的能力扩展模块,让 Agent 拥有专业技能。
Skill 定义格式
Skill 使用 YAML 格式定义:
# skills/translator.yaml
name: "translator"
version: "1.0.0"
description: "多语言翻译技能"

parameters:
  - name: "text"
    type: "string"
    required: true
    description: "待翻译的文本"

  - name: "target_lang"
    type: "string"
    required: true
    enum: ["en", "zh", "ja", "ko"]
    description: "目标语言"

prompt_template: |
  请将以下文本翻译成 {{target_lang}}:

  {{text}}

  要求:
  - 保持原文语气和风格
  - 专业术语准确翻译
  - 符合目标语言习惯

model:
  prefer: "gpt-4-turbo"
  fallback: "claude-3-sonnet"
内置 Skills
OpenClaw 提供了一系列内置技能:
# config.yaml
skills:
  builtin:
    - name: "code_review"
      enabled: true

    - name: "data_analysis"
      enabled: true

    - name: "text_summarization"
      enabled: true

    - name: "image_generation"
      enabled: true
      config:
        provider: "dalle-3"

    - name: "web_search"
      enabled: true
      config:
        engine: "google"
        api_key: "${GOOGLE_API_KEY}"
自定义 Skill 开发
创建你自己的技能:
# skills/code_optimizer.yaml
name: "code_optimizer"
version: "1.0.0"
description: "代码性能优化建议"

input_schema:
  type: "object"
  properties:
    code:
      type: "string"
    language:
      type: "string"
      enum: ["javascript", "python", "go"]

steps:
  - name: "analyze"
    action: "llm"
    prompt: "分析以下 {{language}} 代码的性能瓶颈"

  - name: "optimize"
    action: "llm"
    prompt: "提供优化建议和重构代码"

  - name: "benchmark"
    action: "code_execution"
    script: "run_benchmark.py"

output_format:
  - 性能分析报告
  - 优化后的代码
  - 性能提升百分比
Skill 组合
将多个技能组合成工作流:
workflows:
  - name: "博客文章生成"
    description: "从想法到发布的完整流程"

    steps:
      - skill: "outline_generator"
        input:
          topic: "{{user_topic}}"

      - skill: "content_writer"
        input:
          outline: "{{step.1.output}}"

      - skill: "seo_optimizer"
        input:
          content: "{{step.2.output}}"

      - skill: "image_generator"
        input:
          prompt: "{{step.1.output.title}}"

      - skill: "publisher"
        input:
          content: "{{step.3.output}}"
          image: "{{step.4.output}}"
Skills 让 Agent 像人类专家一样具备专业能力。
社区与生态
加入 OpenClaw 社区,与全球开发者一起构建 AI Agent 生态。
GitHub 社区
OpenClaw 是完全开源的项目:
- 仓库: github.com/openclaw/openclaw
- Star 数: 10k+ (持续增长中)
- 贡献者: 200+ 活跃开发者
- License: Apache 2.0
参与方式:
- 提交 Issue 反馈问题或建议
- 参与 Discussions 讨论技术方案
- 提交 Pull Request 贡献代码
- 完善文档和教程
贡献指南
成为贡献者的步骤:
# 1. Fork 项目
# 2. 克隆到本地
git clone https://github.com/your-username/openclaw.git

# 3. 创建特性分支
git checkout -b feature/my-awesome-feature

# 4. 提交改动
git add .
git commit -m "feat: add awesome feature"

# 5. 推送到 GitHub
git push origin feature/my-awesome-feature

# 6. 创建 Pull Request贡献类型:
- 新功能开发
- Bug 修复
- 文档完善
- 测试用例
- 性能优化
- 国际化翻译
插件生态
社区贡献的插件和扩展:
| 插件名 | 功能 | 维护者 |
|---|---|---|
| openclaw-langchain | LangChain 集成 | @community |
| openclaw-database | 数据库操作工具 | @dbteam |
| openclaw-crm | CRM 系统集成 | @salesteam |
| openclaw-monitoring | 监控和告警 | @devops |
安装插件:
openclaw plugin install openclaw-langchain
openclaw plugin enable openclaw-langchain
Roadmap
未来发展方向:
2026 Q2:
- 支持更多 LLM 提供商
- 图形化配置界面
- 性能优化和资源占用降低
2026 Q3:
- 多租户支持
- 企业级权限管理
- 审计日志和合规性
2026 Q4:
- AI Agent Marketplace
- 云原生部署方案
- 可视化 Workflow 编辑器
参与 Roadmap 讨论: GitHub Discussions
进阶技巧与最佳实践
从实战经验中总结的技巧,帮你更好地使用 OpenClaw。
Prompt Engineering 技巧
写出高质量的 System Prompt:
# ❌ 不好的 Prompt
system_prompt: "你是一个助手"

# ✅ 好的 Prompt
system_prompt: |
  你是一个专业的 Python 后端工程师,专注于:

  **技术栈**:
  - Python 3.11+, FastAPI, SQLAlchemy
  - PostgreSQL, Redis, Celery
  - Docker, Kubernetes

  **代码规范**:
  - 遵循 PEP 8 和 Google Python Style Guide
  - 使用类型注解(Type Hints)
  - 编写单元测试,覆盖率 > 80%
  - 添加详细的 docstring

  **响应格式**:
  - 先分析问题,再给出方案
  - 代码必须可直接运行
- 说明设计决策的理由关键原则:
- 具体明确的角色定位
- 列出技术栈和工具偏好
- 明确代码风格和规范
- 定义输出格式要求
性能优化
提升 Agent 响应速度:
# 1. 使用流式响应
agent:
  response_mode: "streaming"

# 2. 设置合理的超时
timeout:
  llm_request: 30s
  tool_execution: 60s

# 3. 启用缓存
cache:
  enabled: true
  ttl: 3600  # 1 小时

  semantic_cache:
    enabled: true
    similarity_threshold: 0.95

# 4. 并行执行工具调用
tools:
  parallel_execution: true
  max_concurrent: 5

# 5. 模型选择优化
routing:
  - pattern: "简单问答"
    model: "gpt-3.5-turbo"  # 快速便宜
  - pattern: "复杂任务"
    model: "gpt-4-turbo"  # 能力强
安全最佳实践
保护你的 OpenClaw 部署:
security:
  # 1. 启用身份验证
  auth:
    enabled: true
    type: "jwt"
    secret: "${JWT_SECRET}"

  # 2. 限制文件系统访问
  file_system:
    chroot: "/workspace"
    readonly_paths:
      - "/etc"
      - "/usr"

  # 3. 沙箱隔离
  sandbox:
    enabled: true
    network_isolation: true
    resource_limits:
      cpu: "1.0"
      memory: "2GB"

  # 4. 敏感信息过滤
  content_filter:
    enabled: true
    patterns:
      - "password"
      - "api_key"
      - "secret"
      - "token"

  # 5. 审计日志
  audit:
    enabled: true
    log_level: "info"
    retention_days: 90
生产部署检查清单
部署到生产环境前的检查项:
- 环境变量: 所有敏感信息使用环境变量
- HTTPS: 配置 SSL/TLS 证书
- 备份: 配置数据库自动备份
- 监控: 接入 Prometheus + Grafana
- 告警: 配置错误告警和性能告警
- 限流: 设置 API 限流和预算控制
- 日志: 集中化日志收集(ELK/Loki)
- 高可用: 至少 2 个实例 + 负载均衡
- 灾难恢复: 准备应急预案和恢复流程
- 文档: 完善运维文档
# 生产环境推荐配置
production:
  replicas: 3

  resources:
    requests:
      cpu: "2"
      memory: "4Gi"
    limits:
      cpu: "4"
      memory: "8Gi"

  autoscaling:
    enabled: true
    min_replicas: 3
    max_replicas: 10
    target_cpu: 70

  health_check:
    liveness_probe:
      path: "/health"
      interval: 10s
    readiness_probe:
      path: "/ready"
      interval: 5s
掌握这些技巧,你就能构建生产级的 AI Agent 系统。